The nether portal is more than just a functional gateway, it’s a statement piece. Whether you’re stepping into the fiery depths for the first time or you’ve made the trip a hundred times, there’s no reason your portal should be a boring obsidian rectangle floating in the middle of nowhere. In 2026, Minecraft builders are pushing portal aesthetics further than ever, transforming these dimensional gateways into stunning architectural features that blend seamlessly with castles, underwater bases, futuristic cities, and everything in between.
This guide covers over 50 creative nether portal designs minecraft players can build right now, ranging from beginner-friendly enhancements to advanced multi-portal hubs that’ll make your friends do a double-take. You’ll find medieval ruins, sci-fi chambers, biome-specific builds, and techniques for creating custom portal shapes that break away from the standard frame. Let’s turn that basic portal into something worth showing off.
Table of Contents
ToggleKey Takeaways
- Minecraft nether portal design transforms basic obsidian frames into stunning architectural centerpieces that enhance your world’s aesthetic across medieval, fantasy, modern, and sci-fi themes.
- A functional nether portal requires a minimum 4×5 obsidian frame with a maximum 23×23 size, and corners don’t need obsidian, allowing creative flexibility in creating custom shapes and decorative styles.
- Portal linking follows an 8:1 coordinate ratio between dimensions, enabling builders to create strategic multi-portal hubs and networks by calculating precise Nether coordinates for separate Overworld gateways.
- Simple enhancements like stone brick borders, symmetrical pillars, lanterns, and integration into hillsides or caves deliver impressive visual impact without requiring advanced building skills or rare materials.
- Themed portal designs including jungle temples, underwater structures, desert pyramids, and ice formations create environmental cohesion, making gateways feel organically connected to their surroundings.
- Efficient obsidian farming through controlled lava pools and resource planning with shulker boxes enables ambitious survival-mode nether portal projects without material shortages or burnout.
Understanding Nether Portal Basics and Mechanics
Before diving into elaborate minecraft portal designs, it’s worth refreshing the fundamentals. Knowing how portals actually work will save you headaches when your custom build doesn’t light up, or when you accidentally link two portals you meant to keep separate.
Minimum Size Requirements and Obsidian Placement
A functional nether portal requires a minimum frame of 4 blocks wide by 5 blocks tall (or 5 wide by 4 tall), creating an interior space of 2×3 blocks. The maximum size caps at 23×23 blocks, giving you a massive 21×21 interior. Corners don’t need obsidian, players often fill them with decorative blocks or leave them empty.
The portal frame must be complete obsidian on all four sides. You can’t substitute other blocks for structural integrity, though you can hide obsidian behind other materials or build false frames around the actual working portal. This flexibility is key for creating illusions of different portal shapes while maintaining functionality.
You need 10 obsidian blocks minimum for the standard frame (14 if you include corners). Lighting requires flint and steel or alternative fire sources like fire charges, though creative builders sometimes use lava, ghast fireballs, or even lightning strikes via channeling tridents in storms.
How Portal Linking Works Between Dimensions
Portal linking operates on an 8:1 coordinate ratio. Every block traveled in the Nether equals eight blocks in the Overworld. When you create a portal, the game searches for existing portals within range in the other dimension, roughly 128 blocks in the Overworld, 16 blocks in the Nether.
If no portal exists within range, Minecraft generates a new one at the corresponding coordinates. This can lead to portals appearing in unexpected locations, inside mountains, underground, or floating in the air. For precise portal networks, many players manually build both sides at calculated coordinates.
Multiple Overworld portals can link to a single Nether portal if they’re close enough (within about 1,024 blocks of each other in the Overworld). This creates some interesting design opportunities for portal hubs, though it can also cause frustration if you’re trying to maintain separate pathways. Breaking and relighting portals forces the game to recalculate links, which experienced builders use to fix misaligned connections.
Simple Yet Stunning Nether Portal Designs for Beginners
You don’t need a double chest full of rare materials to make your portal look good. These beginner-friendly designs use common blocks and straightforward building techniques while delivering impressive visual impact.
Classic Frame Enhancements with Minimal Resources
The easiest upgrade involves adding a border around your standard portal frame. Stone bricks, polished blackstone, or dark oak logs create instant contrast against obsidian’s purple-black surface. Build the border one block wider than your portal frame on all sides, then add depth by extending back 2-3 blocks to create a recessed gateway effect.
Adding chiseled stone bricks or polished blackstone bricks at the corners creates visual anchors. For a mystical touch, place crying obsidian at intervals around the frame, it emits purple particles that complement the portal’s swirling texture.
Another low-effort enhancement: symmetrical pillars on each side. Build two columns using blackstone brick stairs tapering upward, or create thick 2×2 pillars capped with lanterns or end rods. This takes maybe five minutes and transforms a flat portal into something with architectural presence.
Natural Integration: Building Portals into Hillsides and Caves
Rather than building a structure around your portal, let the terrain do the work. Carve your portal directly into a hillside or cliff face, smoothing the stone around it to create a natural cave entrance. Leave some blocks rough and uneven, perfection kills the organic feel.
For cave portals, excavate a chamber just large enough to accommodate the frame plus walking space. Add vines, glow berries, and moss blocks around the entrance to suggest age and abandonment. Dripstone hanging from the ceiling adds verticality, while pointed dripstone placed strategically can create natural-looking stalagmites framing the gateway.
Riverbank portals work surprisingly well. Position your portal so it appears to emerge from the water’s edge, with the frame partially submerged. Build up the surrounding banks with mud blocks, mangrove roots, and lily pads for a swampy, mysterious vibe. The contrast between water and nether fire creates an appealing visual tension.
Floating Portal Designs with Platform Bases
Floating portals make strong first impressions. Start with a platform 7×7 or 9×9 blocks using nether bricks, blackstone, or end stone, materials that visually tie to dimensional travel. Build your portal in the center, then add chains extending down from each corner to create the illusion of suspension.
For a more dramatic effect, use end rods pointed downward to suggest energy or propulsion keeping the platform aloft. Surround the platform edge with iron bars or nether brick fence to prevent accidental falls, or embrace danger and leave it open.
Some builders add particle effects using campfires (hidden beneath trapdoors) or bubble columns (if built above water). The rising particles enhance the magical atmosphere. If you’re building in creative or have access to modding tools, you can experiment with custom particle effects that really sell the floating concept.
Medieval and Fantasy-Themed Portal Builds
Medieval and fantasy aesthetics dominate Minecraft building communities, and portals offer perfect opportunities to lean into those themes. These designs transform your gateway into ancient relics or magical constructs that feel pulled from high fantasy.
Stone Brick Ruins and Ancient Temple Gateways
Ruined temple portals suggest forgotten civilizations and lost magic. Build a rectangular structure using stone bricks, cracked stone bricks, and mossy stone bricks in a randomized pattern. Intentionally leave gaps in walls and columns, structural decay is the goal.
Surround your portal with broken pillars at varying heights. Build columns 8-12 blocks tall, then delete random sections to create the appearance of collapse. Scatter cobblestone, andesite, and gravel around the base as fallen debris. Vines draping down broken walls sell the abandoned aesthetic.
Add chiseled stone brick blocks depicting creeper faces or wither symbols as decorative elements suggesting the temple’s original purpose. Place skeleton skulls or wither skeleton skulls on broken pillars as remnants of ancient guardians. For lighting, use soul lanterns placed asymmetrically, never in neat rows, since ruins aren’t maintained.
Some builders create entire collapsed chambers, with the portal frame being the only intact structure. This storytelling approach, the gateway survived when everything else fell, adds narrative weight to your build.
Castle Tower Portal Rooms
For players with established castle builds, dedicating a tower to your nether portal creates a logical fast-travel hub. Design a circular or square tower base at least 11×11 blocks to provide space around the portal itself. Stone bricks form the primary material, with polished andesite or dark oak planks as accent blocks.
Build the tower 15-20 blocks tall, adding stone brick stairs as external detailing and glass pane windows at intervals. Inside, position your portal on the ground floor centered in the room. Flank it with armor stands equipped with full netherite or diamond gear as ceremonial guards.
Wall-mounted lanterns or wall torches provide ambient lighting without cluttering floor space. Add bookshelves along walls to suggest research or study, perhaps scholars use this gateway. Lecterns with written books can provide in-universe lore about the Nether or portal construction.
Connect the portal tower to your main castle via covered walkways or underground tunnels. This integration makes the portal feel like a planned part of your fortress rather than an afterthought tacked onto the courtyard.
Elven and Mystical Forest Portal Designs
Elven-inspired portals blend natural materials with elegant architecture. Use birch logs, stripped birch wood, and white concrete as your primary palette, light colors contrast beautifully against dark obsidian. Build curved archways using birch stairs to create organic flowing shapes rather than harsh right angles.
Surround the portal with cherry blossom leaves (from cherry grove biomes) or azalea leaves to create a canopy effect. Add flowering azalea and glow berries hanging from overhead structures for natural lighting. White stained glass panes can be worked into the design to suggest crystalline or magical materials.
For ground cover, use moss carpets, ferns, and flowers in seemingly random patterns. Lily of the valley and azure bluets reinforce the light color scheme. Place glowstone hidden beneath leaf blocks to create subtle ambient lighting that appears sourceless, perfect for a magical atmosphere.
Some builders add custom trees with intertwined branches framing the portal, using fence and leaves to create the effect. This requires patience but creates stunning results, especially if you vary tree heights and lean them slightly inward toward the portal itself.
Modern and Futuristic Nether Portal Concepts
Not every Minecraft world embraces medieval fantasy. Modern and sci-fi portal designs use clean lines, unusual materials, and lighting effects to create gateways that feel technological rather than magical.
Concrete and Glass Contemporary Structures
Modern portal designs rely heavily on concrete and concrete powder in monochrome schemes. Black concrete, white concrete, and light gray concrete create sharp contrast and clean geometric forms. Build a box frame around your portal using black concrete, then add a white concrete border one block out to create layering.
Glass blocks or tinted glass work as walls, allowing visibility while maintaining enclosure. For a minimalist approach, use white concrete as the primary structure with gray concrete accent strips running horizontally across surfaces. The portal itself becomes a pop of color against the neutral palette.
Quartz blocks (regular, smooth, or pillar variants) add refined detail. Chiseled quartz blocks can serve as decorative panels on otherwise plain walls. For flooring, polished diorite or smooth stone maintains the contemporary aesthetic.
Lighting should be indirect and even. Bury glowstone beneath white carpet or use sea lanterns behind white stained glass to create illuminated wall panels. The goal is ambient glow rather than visible light sources. Many players following contemporary build guides emphasize hidden lighting as essential to modern aesthetics.
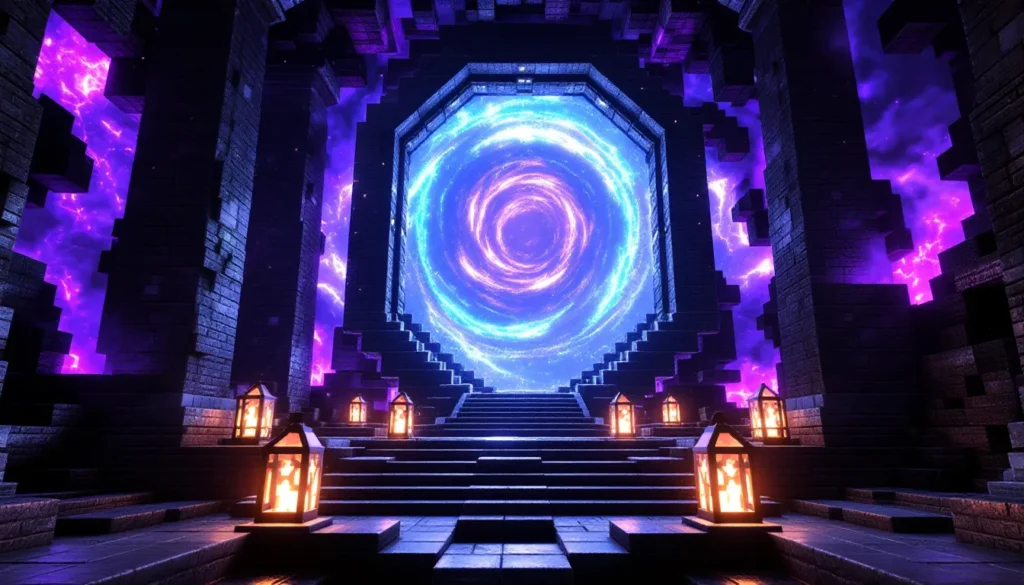
Sci-Fi Portal Chambers with Lighting Effects
Science fiction portals treat the gateway as technology rather than magic. Build a chamber using iron blocks, light gray concrete, and cyan terracotta to suggest a constructed facility. Iron bars create containment fields or safety barriers around the active portal.
Redstone lamps arranged in panels on walls create the illusion of computer monitors or status displays. Wire them to daylight sensors for automatic lighting, or add lever-controlled circuits for manual activation. Observer blocks facing outward can represent sensors, while dispensers and droppers suggest functional machinery.
For dramatic effect, build the portal inside a glass cylinder or chamber, as if it’s contained for safety. Use end rods extending from floor to ceiling around the portal as energy conductors or stabilizers. Sea lanterns work well for this, their bright, even glow suggests power sources.
Beacon beams (if you have the resources) shooting through colored glass create spectacular lighting effects. Place beacons beneath the floor with light blue, cyan, or purple stained glass above them for beams that reinforce the sci-fi vibe. The portal sits within these crossing light beams like an active experiment.
Adding item frames with renamed paper items can create control panels with custom “readouts.” Label them with coordinates, power levels, or dimensional stability readings for extra world-building detail.
Themed Portal Designs: Biomes and Elements
Biome-specific portal designs create environmental cohesion, making your gateway feel like it belongs in its surroundings rather than something dropped randomly into the landscape. These builds use biome-appropriate materials to match their setting.
Ocean and Underwater Portal Builds
Underwater portals present unique challenges, portals deactivate if water flows into the frame, but creative use of barriers makes them possible. Use conduits to provide water breathing in your construction area, then build a prismarine structure around your portal.
Dark prismarine, prismarine bricks, and regular prismarine create the visual palette. Design the structure like a sunken temple with columns and archways. The portal itself sits in an air pocket, use sponges to clear water, then build walls of glass blocks or prismarine to maintain the dry space.
Sea lanterns provide thematic lighting and work perfectly in underwater contexts. Place kelp, sea pickles, and coral blocks around the exterior for decoration. Tube coral fans and brain coral fans add color variation against blue-green prismarine.
For builds visible from the surface, position the structure at mid-depth (around Y-level 50) so players can see the glow from both above and below. Bubble columns created by soul sand or magma blocks can serve as visual elements drawing attention to the portal location.
Some ambitious builders create entire underwater bases with the portal as a centerpiece chamber, treating it as the facility’s emergency exit or long-distance travel hub.
Desert Pyramid and Sandstone Gateway Designs
Desert portals leverage sandstone variants to create ancient, sun-bleached structures. Build a pyramid shell using smooth sandstone as the primary block, with cut sandstone and chiseled sandstone as decorative elements. Position your portal at ground level or buried partially underground, accessible via a descending staircase.
Sandstone walls forming a rectangular gateway create an Egyptian tomb aesthetic. Add dead bushes, cactus, and terracotta around the base for environmental detail. Orange terracotta and red sand reinforce the desert palette.
Inside the structure, use TNT (unlit, obviously) as decorative blocks suggesting traps or danger, appropriate for a tomb. Stone pressure plates on the floor create ambiguity about whether traps are real or just aesthetic. Suspicious sand blocks add archaeological flavor if you’re on Java Edition 1.20+.
Torches provide basic lighting, but lanterns or soul lanterns work better for atmosphere. Place them asymmetrically as if they’re ancient light sources placed by the original builders. Pottery sherds displayed in decorated pots can add lore elements if you’re into storytelling.
Exterior decoration might include sphinx statues built from sandstone, or obelisks flanking the entrance. The goal is making players feel they’ve discovered a long-lost gateway rather than built a new one.
Ice and Snow-Themed Portal Structures
Frozen portals work beautifully in tundra, ice spikes, or snowy taiga biomes. Packed ice, blue ice, and snow blocks form your material base. Build a crystalline structure around the portal using blue ice as the main block, its intense color contrasts dramatically with obsidian and purple portal swirls.
Ice spikes (or artificial versions built with packed ice pillars) flanking the portal create natural-looking formations. Vary heights and tilt angles for organic randomness. Powder snow placed strategically adds depth variation, though watch for fall-through hazards.
Frosty lighting comes from sea lanterns or glowstone hidden behind ice blocks, creating a diffused glow. End rods work exceptionally well in ice builds, their pale blue-white light matching the frozen aesthetic perfectly. Some builders use light blue stained glass over light sources to reinforce the cold color temperature.
Add icicles using pointed dripstone hanging from overhangs. While dripstone is warm-biome material, its visual similarity to ice formations makes it work. Alternatively, use blue ice stairs (placed upside down) to suggest frozen water drips.
Polar bears (if you can transport them safely) or snow golems positioned nearby add life to the scene. Spruce trees with snow layers on leaf blocks frame the portal in environmental context.
Jungle Temple and Overgrown Portal Ideas
Jungle portals embrace chaos and overgrowth. Use mossy cobblestone, mossy stone bricks, and jungle logs as foundational materials. Build a temple structure that looks partially reclaimed by nature, walls at odd angles, missing blocks, and vines covering every surface.
Jungle planks and bamboo (including bamboo mosaics for flooring) create textural variety. The portal sits inside a ruined chamber, possibly with a partially collapsed roof allowing jungle leaves to intrude from above. Vines should cascade down obsidian portal frames, though ensure they don’t block the actual portal space.
Carved pumpkins and jack o’lanterns work as guardian faces or decorative elements suggesting ancient inhabitants. Melons growing wild around the base indicate agricultural abandonment. Cocoa pods on jungle logs add small color pops.
For lighting, torches alone feel too neat. Use campfires (including soul campfires) to suggest ritual fires, or hide glowstone beneath moss carpets for subtle ambient light. Frogs and tropical fish in nearby water features add biodiversity.
Some builders create stone brick staircases leading up to elevated portal platforms, with steps cracked and uneven. The journey to reach the portal becomes part of the design, suggesting it was an important destination for the temple’s original users.
Advanced Building Techniques for Custom Portal Shapes
Once you’ve mastered standard portal decoration, custom shapes and multi-portal systems open up new possibilities. These techniques require more planning but create truly unique results.
Creating Oversized and Non-Standard Portal Frames
The 23×23 maximum portal size is massive, 441 blocks of interior space, but few players actually build to that scale. An oversized portal makes for an impressive centerpiece. Calculate your frame dimensions, remembering you need complete obsidian on all sides.
For a 15×15 portal (13×13 interior), you’ll need 56 obsidian blocks. The sheer size creates presence, but you’ll want substantial architecture around it to maintain proportion. A portal this large looks awkward without a building to match.
Non-rectangular shapes are possible through illusion. The actual portal must remain rectangular, but you can hide the functional frame within decorative structures. Build a circular stone archway, for example, with the obsidian portal frame hidden inside. Fill the visible gaps with black concrete or obsidian to create a circular appearance, while the actual portal remains rectangular.
Diagonal portals require similar techniques. Rotate your decorative frame 45 degrees while keeping the functional portal aligned to the grid. The effect suggests a diagonal gateway, though the actual portal mechanically remains standard.
For truly ambitious builds, multi-layer portals create depth. Build two portal frames parallel to each other, several blocks apart, then construct tunnels or chambers connecting them. Only one portal functions, but the visual suggests a longer gateway passage.
Multi-Portal Hubs and Linked Gateway Systems
Portal hubs solve the problem of multiple Nether destinations from a single Overworld location. Build several portals in close proximity, within 20-30 blocks, and link each to different Nether-side portals by calculating coordinates precisely.
The coordinate formula is simple: divide Overworld X and Z coordinates by 8 for Nether placement. If your Overworld portal sits at X=800, Z=1600, the Nether portal should be at X=100, Z=200. Build each Nether portal at exact coordinates to maintain separate links.
In your hub, label each portal clearly using signs, item frames, or renamed blocks so players know which destination each gateway reaches. Organize portals in a grid, circle, or linear arrangement depending on available space. Many advanced hub designs incorporate hallways or transit tunnels between portals.
Aesthetic consistency matters in hubs. Use uniform framing for all portals, varying only the labeling and minor decorative details. This creates visual cohesion, players immediately recognize they’re in a transit facility rather than random scattered portals.
For servers or multiplayer, access control might matter. Build iron door entrances with buttons or pressure plates for semi-restricted access, or use redstone locks for more security. This prevents random players from using portals meant for specific bases or projects.
Some builders create vertical portal hubs with portals stacked on multiple floors. This saves horizontal space but requires good circulation, ladders, water elevators, or spiral staircases to move between levels efficiently.
Lighting, Decoration, and Atmosphere Enhancement
Lighting and peripheral decoration often make the difference between a decent portal and a memorable one. These details create atmosphere and draw attention to your gateway.
Using Lanterns, Torches, and Glowstone for Ambiance
Lanterns remain the most versatile light source for portal builds. Regular lanterns emit warm yellowish light suitable for medieval and natural themes. Soul lanterns produce blue-tinted light that complements the Nether’s eerie atmosphere perfectly.
Hang lanterns from chains or iron bars rather than placing them on blocks. Suspended lighting feels less grounded, adding to the mystical or otherworldly atmosphere. Stagger heights and positions asymmetrically unless your design specifically calls for symmetry.
Torches work for rough or ancient builds where refined lighting would feel out of place. Soul torches maintain the blue lighting theme and suggest magical or cursed locations. Combine torch types, regular on one side, soul on the other, to create light-dark contrasts.
Glowstone excels as hidden lighting. Bury it beneath carpets, leaves, or trapdoors to create ambient glow without visible sources. This technique works especially well for magical or mysterious portals where light should seem sourceless. Sea lanterns function identically but with cooler color temperature.
Shroomlights provide warm orange-toned lighting and fit thematically if you’re building with warped or crimson wood. Their organic texture pairs well with natural or overgrown portal designs.
Redstone Lighting Effects and Animated Features
Redstone lamps enable dynamic lighting. Wire them to daylight sensors for automatic day-night activation, creating portals that “wake up” at dusk. Or use observer-based clocks to create pulsing effects, lamps that flicker or pulse suggest unstable dimensional energy.
A simple observer clock creates alternating pulses. Place two observers facing each other, run redstone from one to your lamps, and they’ll flash on-off continuously. Add repeaters to slow the pulse rate to your preferred speed. This effect around a portal frame suggests active power.
Piston doors hiding your portal create dramatic reveals. Build retractable walls using sticky pistons and trigger them with pressure plates, buttons, or tripwires. The portal appears only when approached, as if the gateway responds to presence.
Note blocks can add audio ambiance. Set up a redstone music circuit that plays eerie tones when players approach using tripwire hooks or sculk sensors (1.19+). The audio reinforces the atmosphere, though this works better in single-player where you control when the circuit activates.
Item frames with blocks rotating via redstone can create animated symbols or runes around your portal. This requires command blocks in creative mode but produces compelling effects for adventure maps or role-play servers.
Landscaping Around Your Portal for Maximum Impact
Portal landscaping extends your design into the surrounding environment. Clear a 20×20 block area minimum around your portal for intentional terrain shaping. Random natural terrain rarely complements structured builds.
Pathways leading to your portal improve flow and presentation. Use path blocks, stone brick stairs, or custom patterns to create roads or trails. Add fences, hedges, or low walls on path edges for definition. The pathway announces “this is important” and guides visitors toward your gateway.
Terraforming creates dramatic settings. Raise or lower terrain to place your portal on a hill, cliff edge, or in a valley. Elevated portals gain visibility and prestige, you see them from a distance. Sunken portals feel hidden and mysterious, perfect for secret bases.
Vegetation softens hard architecture. Plant custom trees, flower gardens, or crop fields around portals. For dark or ominous portals, use dead bushes, brown mushrooms, and podzol to suggest corrupted earth. Bright portals benefit from flowers, grass, and small ponds creating park-like settings.
Water features, ponds, fountains, or streams, add movement and visual interest. A small lake reflecting your lit portal at night creates stunning screenshots. Waterfalls flanking a portal entrance add drama and sound (if you play with audio).
Statues or monuments near portals reinforce themes. Build armor stand figures, mob heads on pedestals, or abstract sculptures using blocks like end rods, chains, and fences. These sentinel figures make portals feel guarded or ceremonial.
Tips for Building Nether Portals in Survival Mode
Creative mode removes all constraints, but survival building adds meaningful challenges. These strategies help you gather resources and execute large portal projects without burning out.
Efficient Obsidian Farming and Collection Methods
Obsidian farming starts with a diamond or netherite pickaxe, nothing else works. Basic method: locate lava pools (common below Y-level 10), pour water over the surface, then mine the resulting obsidian. Each lava source block becomes one obsidian block.
For large quantities, build a controlled obsidian farm. Create a 10×10 pool at ground level using stone or dirt walls to contain it. Fill with lava buckets (collected from lava lakes), then pour water across the surface. This converts the entire pool to obsidian simultaneously, yielding 100 blocks in one operation.
The Nether itself offers vast lava oceans perfect for farming. Build fireproof platforms from netherrack, stone, or blackstone above the lava ocean, then pour water to create massive obsidian platforms you can mine safely. Bring fire resistance potions as insurance.
Efficiency V pickaxes reduce mining time significantly, obsidian breaks in about 1.5 seconds instead of 9 seconds. Combine with Haste II from a beacon (if available) and you’ll clear obsidian almost as fast as stone.
Alternatively, end cities contain obsidian pillars and platforms. Late-game players often farm these structures for both obsidian and other resources. You’ll need to have beaten the dragon first, but if you’re at that stage, obsidian scarcity is rarely an issue.
Resource Planning for Large-Scale Portal Projects
Large portal builds consume significant resources. Calculate material needs before starting. For a 15×15 portal with a 20×20×30 building around it:
- Obsidian: 56 blocks minimum for the frame
- Primary building blocks: 2,000-3,000 blocks depending on wall thickness
- Decorative blocks: 500-1,000 blocks (stairs, slabs, detail pieces)
- Lighting: 50-100 light sources
- Glass/windows: 200-400 blocks if incorporating windows
Shulker boxes revolutionize large builds. Pack them with sorted materials and carry 27 different material types in your inventory simultaneously. Color-code boxes by material type, light blue for stone variants, brown for wood, black for decorative blocks.
Build farms early in survival worlds. Stone generators, wood farms, and concrete makers eliminate resource gathering as a bottleneck. If your portal design uses concrete, set up a concrete powder converter near your build site, bring powder, water source, and piston pusher for instant conversion.
Work in phases. Complete the functional portal first, frame and basic shelter. This enables Nether access for gathering nether bricks, blackstone, or basalt if your design needs them. Then expand outward in stages: walls, roof, interior decoration, exterior landscaping, lighting. Breaking large projects into completable chunks prevents burnout.
Keep backup materials on-hand. Running out of blocks mid-build kills momentum. Stock 10-20% more than calculated needs. Leftover materials find use in other projects, but material shortages halt construction.
For multiplayer or server builds, coordinate with teammates. Divide gathering duties, one player mines stone while another chops wood and a third handles lighting materials. Parallel resource gathering cuts project time dramatically compared to solo work.
Conclusion
Your nether portal doesn’t have to be just another functional block. Whether you’re hiding it inside a crumbling temple, building a sleek sci-fi chamber, or integrating it seamlessly into an ocean monument, the design possibilities are limited only by creativity and block availability. The gateway between dimensions deserves to be more than an afterthought, it’s a centerpiece, a fast-travel hub, and often one of the first major projects in any long-term world.
Start simple if you’re new to decorative building. A basic frame enhancement or hillside integration teaches fundamental techniques without overwhelming resource requirements. As you grow more comfortable, push into themed builds, custom shapes, and multi-portal networks that transform your Minecraft world’s infrastructure.
Remember that the best portal designs balance aesthetics with functionality. A beautiful portal that’s annoying to use won’t see much traffic. Keep pathways clear, maintain good lighting, and ensure the portal itself remains easily accessible. Your future self, running from ghasts with full inventory, will appreciate the practical design decisions as much as the visual ones.